

This little tree frog is not too complicated to crochet, but it does have very tiny details and wire inside the legs, which are a bit fiddly to make. But if you have some patience and enjoy working on small details, it's right up your alley. Happy crocheting!

Size
About 12 cm (4 3/4"") long including legs, body is about 6 cm (2 1/3), when crocheted with sport weight cotton and a 2.00 mm crochet hook (US size 1/B).
Tip! You can use the same pattern to make larger or smaller toys by using finer or bulkier yarn. Pick a crochet hook at least a size smaller than suggested on yarn label and crochet tightly enough to achieve a tight gauge that will not allow the stuffing to show through the fabric.
Skills required
- Crocheting in spiral
- Magic ring
- Single crochet stitch (double crochet stitch in UK and Australia)
- Increasing
- Decreasing
- Finishing an open piece
- Finishing a closed piece
- Joining pieces
You will need
- Yarn. I used Titan Wool Egitto, a sport weight cotton yarn, 50g =120m (50g =130yd) / 5 ply / 12 wpi / 2: fine. You will need about 20 g or 40 m (50 yd) of yarn.
- 2,25 - 3,00 mm crochet hook (US hook size 1/B - 2/C) or according to the yarn.
- Polyester fiberfill, wool, wadding etc. for stuffing.
- 12 mm safety eyes or buttons, beads, felt etc.
- Yarn needle, scissors, stitch marker.
- Wire and strong tape or "pipe cleaner", wire cutters or pliers.

Abbreviations
- mr, sc n = magic ring – crochet n single crochet stitches into the adjustable loop.
- sc = single crochet stitch (double crochet stitch in UK and Australia).
- sc n = crochet one single crochet stitch in next n stitches.
- inc = increase – crochet two single crochet stitches in the same stitch.
- dbl-inc = double increase – crochet three single crochet stitches in the same stitch.
- dec = decrease – crochet two stitches together using the invisible decrease method.
- (sc 4, inc) x n = repeat the pattern between parentheses n times.
- [36] = number of stitches in a round after finishing round.
Notes
- Work in a continuous spiral, do not join rounds or turn your work, unless instructed otherwise in the pattern.
- Use a stitch marker or a piece of yarn to mark the end or the beginning of a round. Move the marker up after completing each round.
- All stitches are worked into both loops, unless instructed otherwise in the pattern.
Head & Body
1: mr, sc 6 = [6]
2: (sc, inc) x 3 = [9]
3: sc 2, dbl-inc, sc 3, dbl-inc, sc 2 = [13]
4: sc 3, dbl-inc, sc 5, dbl-inc, sc 3 = [17]
5: sc 6, inc, sc, inc, sc, inc, sc 6 = [20]
Place a stitch marker between the 12th and 13th stitch on round 6 and leave it there. This marks the center of the forehead. Use it as guide when placing the eyes.
6: sc 5, dbl-inc, sc 9, dbl-inc, sc 4 = [24]
7-9: sc in each stitch = [24]
Attach safety eyes to either side of the stitch marker, between rows 6 and 7, leaving 8 stitches (count 7 holes) between them.


10: sc 8, dec, (sc, dec) x 3, sc 5 = [20]
Start stuffing the head. Keep adding a bit of fiberfill after every few rounds, stuffing the head and body firmly.
11: sc 7, inc, (sc, inc) x 4, sc 4 = [25]
12: sc 7, inc, sc 12, inc, sc 4 = [27]
13-16: sc in each stitch = [27]
17: sc 6, dec x 2, sc 5, dec, sc 4, dec x 2, sc 2 = [22]
18: sc 6, dec x 2, sc 2, dec, sc 2, dec x 2, sc 2 = [17]
19: sc 5, dec x 2, sc, dec, sc, dec x 2 = [12]
20: dec x 6 = [6]
Finish stuffing. Cut the yarn, leaving a long yarn tail, and close the opening. Fasten and hide the yarn tail.

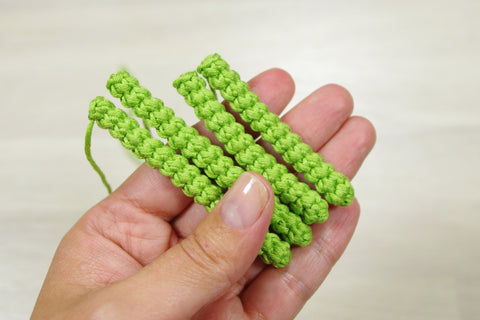
Front legs (make 2)
1: mr, sc 5 = [5]
2-14: sc in each stitch = [5]
Cut the yarn, leaving a long yarn tail for sewing, and fasten off. Do not stuff the legs.
Back legs (make 2)
1: mr, sc 5 = [5]
2-17: sc in each stitch = [5]
Cut the yarn, leaving a long yarn tail for sewing, and fasten off. Do not stuff the legs.
Cut two pieces of wire long enough to fit inside the legs and through the body, plus about 5 cm (2") so you you can bend back the ends. Push the wires through the body where you want the legs to be.

Bend the end back and then wrap a bit of tape around the wire to make sure it won't poke through the fabric.

Push the wire inside the leg and sew it to the body.

Hold up the other leg and bend the wire so it's the right length. Push it inside the second leg and sew the leg to the body. Do the same with the front legs.

Bend the legs to shape.

Toes (make 8)
1: mr, sc 4 = [4]
2-3: sc in each stitch = [4]
Cut the yarn, leaving a long yarn tail for sewing, and fasten off. Do not stuff the toes.
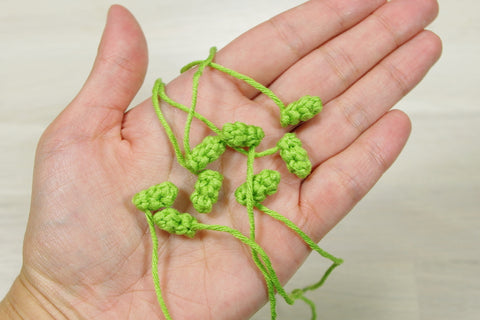
Sew the toes to the legs. Fasten and hide all yarn tails.

Hide all yarn tails. And done!

If you have any questions, do not hesitate to contact me or leave a comment below, I am always happy to help.
I would love to see how your little frogs turn out, so do post a photo to my Facebook page or tag me in your social media posts, I'm @kristitullus on Instagram, Facebook and Twitter.

Copyright 2013 TÜ Spire. All rights reserved.
Please do not post this pattern to your website or blog, instead post a link to https://kristitullus.com/blogs/blog/news/free-pattern-tree-frog. You MAY use this pattern as a teaching aid in any free class or e-course, or as part of a free crochet pattern, provided you credit me as the designer (Kristi Tullus, http://kristitullus.com).
Feel free to sell items made with this pattern.
* Some links may be affiliate links which will allow me to make a small commission on any products purchased using one of these links with no extra cost for you. This does not influence my opinion or recommendations in any way. Thanks for your support.

20 comments
This is such a great pattern! Thank you for sharing it. My tree frog turned out so cute
Couldn’t copy pattern
Vou tentar fazer 😉 muito obrigado por compartilhar o seu trabalho 🥰
Loved this tree frog, it was fun to make, and a easy project for a beginner like myself.
I think there might be some typos in the head & body stitch pattern? Some of the stich patterns don’t match up with the numbers. e.g. Line 3 would increase the number of stitches from 13 to 19, not from 9 to 13, I changed some of the lines as follows:
3. sc2, inc2, sc1, inc 2, sc2 13
4. sc3, inc2, sc3, inc3, sc3 17
5. same
6. sc4, inc 2, sc8, inc2 sc4 24
Hermosa ranita
Claras explicación con sus respectivos dibujos
Mil gracias . Bendiciones