Amigurumi are usually crocheted in sections, which means when all pieces are finished, you need to sew them together. In this post, I will show two ways to join two open pieces.
I usually prefer using the mattress stitch - it creates a really nice clean and sturdy seam and helps avoid a floppy head. But you can pick the one that feels most comfortable to you or even invent your own style.

But before you reach for your needle, you'll want to keep a couple of things in mind:
- Make sure both pieces have the same number of stitches around the opening.
- Whenever possible, crochet the last rounds of both pieces with the same yarn.
- Leave a long yarn tail for sewing on one of the pieces.
WHIP STITCH
Whip stitch is the easiest to master and very straightforward. The only downside is, it is not the neatest one and the stitches will be visible.
1. Holding the two pieces together, insert the needle through a stitch just below the yarn tail, going under both loops, front to back.

2. Then go through the next stitch of the first piece, inserting the needle under both loops, going back to front.

3. Draw the stitch tight.

4. Then make a stitch through the next two stitches, repeating steps 1 - 3.

4. Keep stitching, going all around the pieces. Draw the yarn tight after every stitch.

If you do not see the videos properly, head over to YouTube.
MATTRESS STITCH
Mattress stitch takes a bit more practice to master, but the result will look nice and neat and the stitches will be completely invisible. Which makes it a better option, if your pieces are different colors, creating a nice clean line between the two colors.
1. Holding the two pieces together, insert the needle behind the vertical bar of a stitch directly below the yarn tail.

2. Draw the yarn through.

3. Go back in the same hole where you brought the yarn up last time and go under the next stitch.

4. Draw the yarn through.

5. Go back in the same hole where you brought the yarn up last time and go under the next stitch.
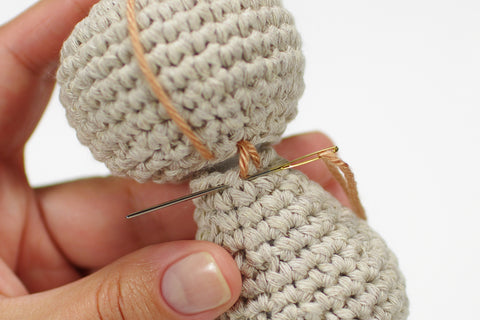
6. Draw the yarn through.

7. Keep repeating steps 3 - 6. It’s easier to see what you are doing, if you don’t pull the yarn tight after every stitch.

8. Make a couple of stitches. Then grab the yarn tail and pull it as tight as you can.

9. And the stitches will become completely invisible.

10. Keep stitching going all around the pieces.

If you do not see the videos properly, head over to YouTube.
If you have any questions, do not hesitate to email me or leave a comment below, I am always happy to help.


3 comments
THAT MATTRESS STITCH CHANGED MY LIFE. THANK YOU!! :)
the mattress stitch is a game changer, thanks for making my amigurumi even better
Thank you so much. I have an awful time with the heads.